Installation
Two separate, complete guides: one for a VPS with SSH and one for cPanel shared hosting. Pick yours and follow it from top to bottom.
Which Guide Do I Need?
Follow one guide from top to bottom. Each one is complete: you do not need any other page to finish the installation.
| VPS guide | cPanel guide | |
|---|---|---|
| You have | A VPS or cloud server with Ubuntu 24.04 and SSH access | Shared hosting with cPanel |
| How you work | Copy and paste commands | Click in cPanel, plus one or two commands |
| Notifications and webhooks | Sent at once by a background worker | Sent within about a minute by a cron job |
| Real-time live chat | Available (optional) | Chat refreshes every few seconds |
| Best for | Live businesses and marketplaces | Small teams and trying FieldOps out |
Not sure? If your provider gave you a cPanel login, use the cPanel guide. If they gave you a server IP address and a root password, use the VPS guide.
What to Prepare
Have these ready before you start, for either guide:
- The FieldOps download from CodeCanyon (Downloads → All files & documentation).
- Your purchase code (Downloads → License certificate & purchase code).
- A domain or subdomain you control, for example
app.example.com. A subdomain is the easiest choice. - An e-mail address and a password for your owner login.
- MySQL 8. FieldOps is built and tested on MySQL 8. Hosts that offer only MariaDB should be asked for MySQL 8 first.
VPS Step 1: Connect and Set Your Values
You need a clean server with Ubuntu 24.04 (2 GB of memory or more is recommended) and its IP address and login from your provider.
| You will see | Replace it with |
|---|---|
app.example.com | Your domain or subdomain |
[email protected] | Your e-mail address (for the HTTPS certificate notices) |
ChooseAStrongPassword | A new database password. Use letters and numbers only |
FieldOps.zip | The real name of your CodeCanyon download |
SERVER_IP | Your server’s IP address |
Keep the install path /var/www/fieldops exactly as written. It is the path the ready-made server files in the package expect, so you do not have to edit them.
Point your domain at the server
At your domain provider, add an A record: name
app(or@for the main domain), valueSERVER_IP. This can take from a few minutes to a few hours to take effect.Open a terminal on the server
On Windows use PowerShell, on Mac use Terminal:
ssh root@SERVER_IP
If your provider gave you another user name, use it in place of
root.Set your values
Edit these three lines, then paste them into the terminal. The next commands use them, so you only type your details once:
DOMAIN=app.example.com
[email protected]
DB_PASS='ChooseAStrongPassword'
These values last until you close the terminal. If you reconnect later, paste the three lines again.
Check the domain
This should print your server’s IP address. If it prints nothing, wait and try again before you continue:
getent hosts "$DOMAIN"
VPS Step 2: Install the Server Software
Install the packages
This installs nginx, MySQL, PHP 8.3, Supervisor and the certificate tool. It takes a few minutes. If a purple screen appears, press Enter.
sudo apt update
sudo apt install -y nginx mysql-server supervisor unzip curl certbot \
  php8.3-fpm php8.3-cli php8.3-mysql php8.3-mbstring php8.3-xml php8.3-curl \
  php8.3-zip php8.3-gd php8.3-intl php8.3-bcmath
curl -sS https://getcomposer.org/installer | php && sudo mv composer.phar /usr/local/bin/composer
Open the firewall
This allows SSH and web traffic. If your provider has its own firewall panel, open ports 22, 80 and 443 there too.
sudo ufw allow OpenSSH
sudo ufw allow 'Nginx Full'
sudo ufw --force enable
Create the database
sudo mysql -e "CREATE DATABASE fieldops CHARACTER SET utf8mb4 COLLATE utf8mb4_unicode_ci;"
sudo mysql -e "CREATE USER 'fieldops'@'localhost' IDENTIFIED BY '$DB_PASS';"
sudo mysql -e "GRANT ALL PRIVILEGES ON fieldops.* TO 'fieldops'@'localhost';"
VPS Step 3: Upload FieldOps
Upload the download
Use a free SFTP program such as FileZilla. Connect with host
SERVER_IP, port22and your server login, then uploadFieldOps.zipto your home folder.Put the web app in place
This unzips the download, copies the
WebSourceCodefolder to/var/www/fieldopsand gives it to the web server user:cd ~ unzip -q FieldOps.zip -d fieldops-download sudo mkdir -p /var/www/fieldops sudo cp -a "$(find fieldops-download -type d -name WebSourceCode | head -1)/." /var/www/fieldops/ sudo chown -R www-data:www-data /var/www/fieldops
If the copy command reports an error, your download has another zip inside it. Unzip that inner zip into
fieldops-downloadas well, then run the last three lines again.Install the PHP libraries
The package does not include the
vendorfolder. Composer downloads it:cd /var/www/fieldops sudo -u www-data env COMPOSER_HOME=/tmp/fieldops-composer composer install --no-dev --optimize-autoloader --no-interaction
Check: ls /var/www/fieldops/vendor/autoload.php prints the file name, with no error.
VPS Step 4: Website and HTTPS
Get the HTTPS certificate
A free Let’s Encrypt certificate. It renews by itself.
sudo certbot certonly --webroot -w /var/www/html -d "$DOMAIN" -m "$EMAIL" \
  --agree-tos --no-eff-email --non-interactive --deploy-hook "systemctl reload nginx"
Apply the PHP settings
cd /var/www/fieldops
sudo cp deploy/php/99-fieldops.ini /etc/php/8.3/fpm/conf.d/
sudo cp deploy/php/99-fieldops.ini /etc/php/8.3/cli/conf.d/
sudo systemctl reload php8.3-fpm
Turn on the website
This fills in your domain in the ready-made nginx file and switches to it:
cd /var/www/fieldops
sudo sed "s/app.example.com/$DOMAIN/g" deploy/nginx/fieldops.conf | sudo tee /etc/nginx/sites-available/fieldops > /dev/null
sudo ln -sf /etc/nginx/sites-available/fieldops /etc/nginx/sites-enabled/fieldops
sudo rm -f /etc/nginx/sites-enabled/default
sudo nginx -t && sudo systemctl reload nginx
Check: sudo nginx -t says syntax is ok and test is successful, and https://app.example.com (your domain) opens the FieldOps installer in your browser.
VPS Step 5: Run the Web Installer
Open your domain in a browser. It goes to the installer by itself.
Screen 1: Requirements
Every line should have a green tick. Press Continue. A red line tells you exactly what is missing; the fixes are at the end of this guide.
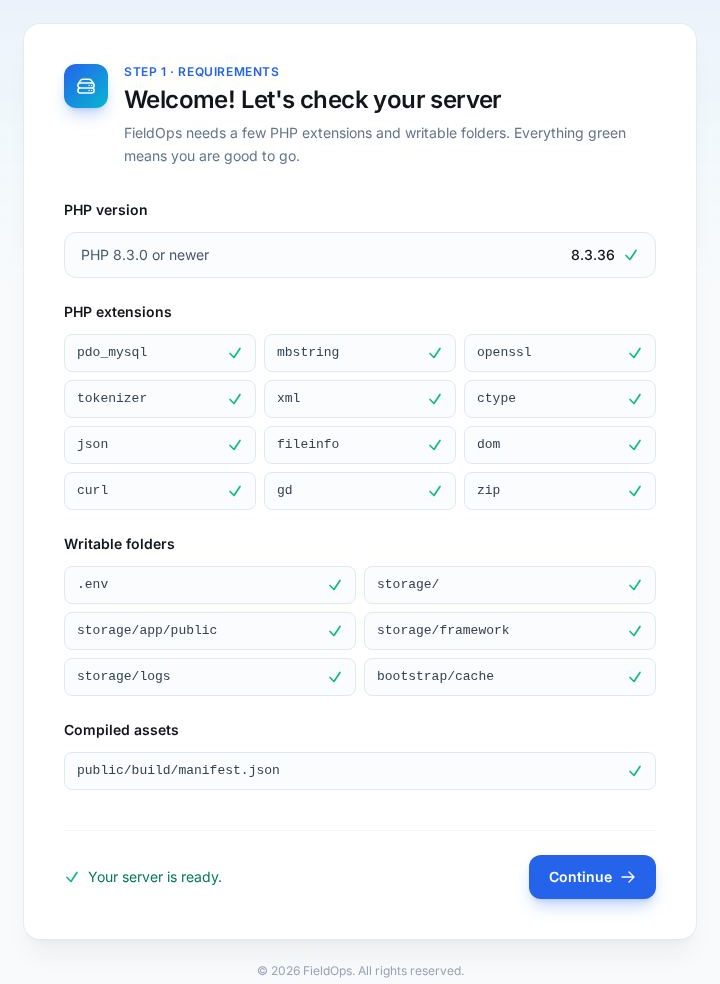
Everything green: press Continue Screen 2: License
Paste your Envato purchase code. You find it on CodeCanyon under Downloads → License certificate & purchase code.
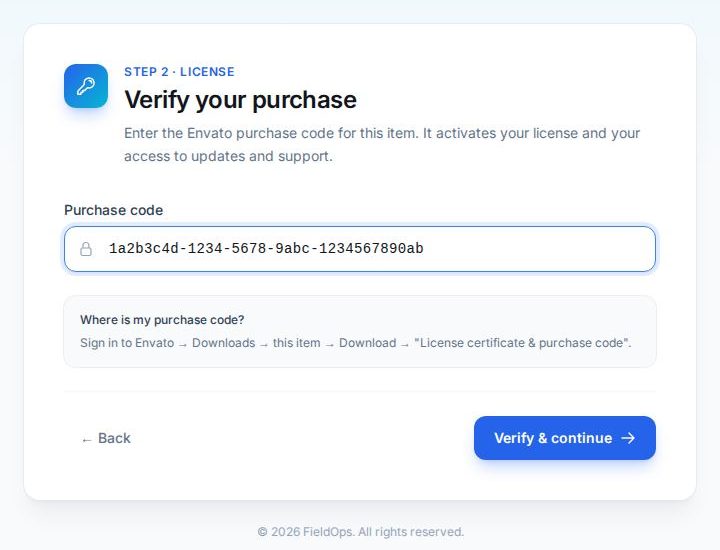
The code shown is a sample; use your own Screen 3: Database
Enter these values, then press Connect & install tables:
Field Value Database host 127.0.0.1Port 3306Database name fieldopsUsername fieldopsPassword The password you chose in Step 1 ( ChooseAStrongPasswordis the placeholder)This creates all the tables and can take a few minutes. Do not close or refresh the page.
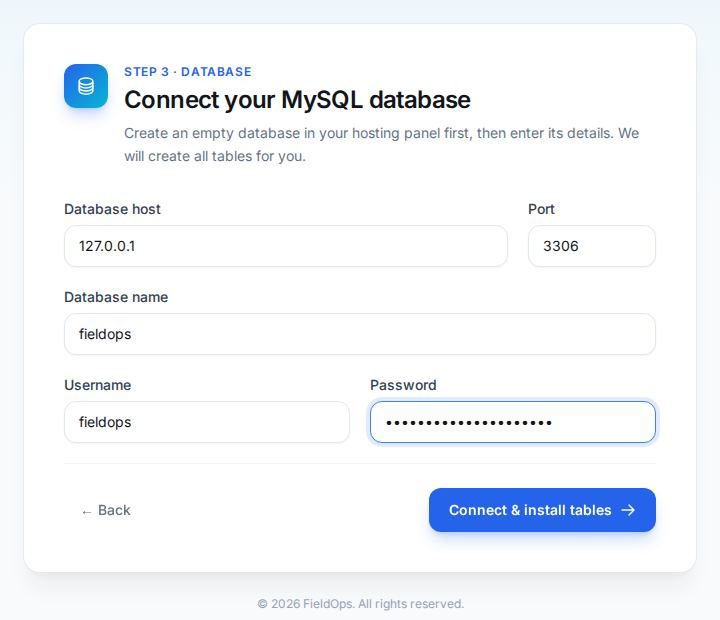
Sample values; use your own Screen 4: Site & admin
You can change all of this later:
Field What to enter Site name Your business or platform name Site URL Your full address with https://, for examplehttps://app.example.comLogo, Favicon Optional. You can add them later Multi-vendor marketplace On: other service companies can sign up and sell on your site. Off: you run one company only. You can switch later Company name Your own service company Your name, Email, Password Your owner login. Write it down. This account is also the platform admin 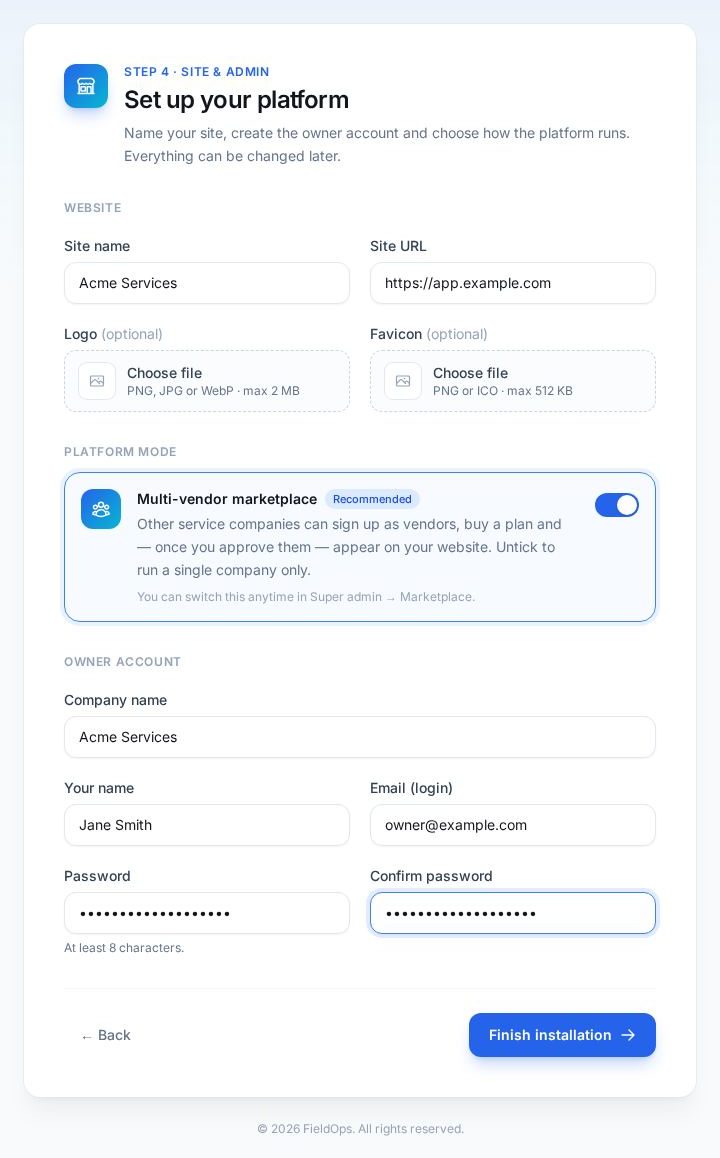
Sample values; use your own Screen 5: Finish
You see “… is live!” and the installer locks itself. The page also shows a cron line; you add it in the next step of this guide, so you can ignore it here.
VPS Step 6: Background Jobs
FieldOps needs two things running all the time: a scheduler (reminders, renewals, backups) and a queue worker (notifications and webhooks). The package includes both files, ready to copy:
cd /var/www/fieldops
sudo cp deploy/cron/fieldops /etc/cron.d/fieldops
sudo chmod 644 /etc/cron.d/fieldops
sudo cp deploy/supervisor/fieldops-worker.conf /etc/supervisor/conf.d/
sudo supervisorctl reread
sudo supervisorctl update
sudo supervisorctl status
Check: the last command shows fieldops-worker as RUNNING.
VPS Step 7: Secure and Finish
Lock down the settings file
cd /var/www/fieldops
sudo sed -i 's/^LOG_LEVEL=.*/LOG_LEVEL=warning/' .env
grep -q '^SESSION_SECURE_COOKIE=' .env || echo 'SESSION_SECURE_COOKIE=true' | sudo tee -a .env > /dev/null
sudo chown www-data:www-data .env
sudo chmod 640 .env
sudo -u www-data php artisan config:cache
sudo -u www-data php artisan queue:restart
Sign in
Open
https://app.example.com/login(your domain) with your owner login. The platform console is at/admin.Set up e-mail
In the console: System → Platform settings. Enter your SMTP details, or invitations, password resets and invoices will not be sent. Details: Mail.
Run the readiness report
sudo -u www-data php artisan fieldops:check-production
Fix every line marked CRITICAL. A warning for a service you do not use (SMS, WhatsApp, push, AI, a payment gateway) is fine.
Delete the upload
rm -rf ~/fieldops-download ~/FieldOps.zip
Done. After a few minutes, System → Platform health shows the scheduler heartbeat. Next: First Run and Mobile App.
VPS: Problems and Fixes
| What you see | What to do |
|---|---|
Unable to locate package php8.3-fpm | The server is not on Ubuntu 24.04. Reinstall it with Ubuntu 24.04 from your provider’s panel. |
nginx will not start, Address already in use | Your server came with Apache. Run sudo systemctl disable --now apache2, then sudo systemctl restart nginx. |
| certbot fails | The domain does not point at this server yet, or port 80 is blocked. Check getent hosts "$DOMAIN" and your provider’s firewall panel, then run the certbot command again. |
502 Bad Gateway | PHP is not running. Run sudo systemctl restart php8.3-fpm. |
500 error or a blank page | Make sure vendor/autoload.php exists (Step 3). Then read the error: sudo tail -n 30 /var/www/fieldops/storage/logs/laravel.log. |
| A red writable line in the installer | Run sudo chown -R www-data:www-data /var/www/fieldops and reload the page. |
| Database connection failed | Check the password from Step 1. Host 127.0.0.1 and localhost both work on a standard server, so you can try the other one. |
| Installer page timed out on the database screen | Open the page again and enter the same details. Choose Keep the existing data: only the missing tables are added. |
| Uploaded logos or photos do not show | Run cd /var/www/fieldops && sudo -u www-data php artisan storage:link. |
fieldops-worker shows FATAL | Read /var/www/fieldops/storage/logs/worker.log. Most often the installer has not been finished yet. |
cPanel Step 1: Set the PHP Version
Log in to cPanel. Menu names differ a little between hosts. These are the placeholders used in this guide:
| You will see | Replace it with |
|---|---|
USER | Your cPanel user name |
app.example.com | Your domain or subdomain |
/home/USER/fieldops | The folder you create in Step 2. Keep the name fieldops to match this guide |
FieldOps.zip | The real name of your CodeCanyon download |
Choose PHP 8.3
Open MultiPHP Manager (or Select PHP Version) and set your domain to PHP 8.3 or newer.
Turn on the extensions
In Select PHP Version → Extensions, tick:
pdo_mysql,mbstring,openssl,tokenizer,xml,ctype,json,fileinfo,dom,curl,gd,zip,bcmath,intl. If your cPanel has no such page, most of these are already on, and the installer tells you if one is missing.Set the limits
In MultiPHP INI Editor (or Select PHP Version → Options):
memory_limit256M,upload_max_filesize64M,post_max_size64M,max_execution_time120.
cPanel Step 2: Upload FieldOps
Do not upload FieldOps into public_html. It goes one level above, so your private settings can never be opened from the web.
Upload the zip
Open File Manager and go to your home folder (
/home/USER, the top level). Press Upload and chooseFieldOps.zip.Extract it
Back in File Manager, right-click the zip and choose Extract. If you now see another zip inside, extract that one too.
Move the web app
Open the extracted folders until you see
WebSourceCode. Right-click it, choose Rename and call itfieldops. Right-click it again, choose Move, enter/and confirm. It is now at/home/USER/fieldops.Check the hidden files
Press Settings (top right), tick Show Hidden Files and open
fieldops. You should seeartisan,.env.exampleand the foldersappandpublic.Clean up
Delete the zip and the leftover extracted folder from your home folder.
cPanel Step 3: Install the PHP Libraries
The package does not include the vendor folder, and FieldOps cannot start without it. Use the first option your hosting allows.
Option A: cPanel Terminal (easiest)
Open Terminal (under Advanced) and paste:
cd ~/fieldops
/opt/cpanel/ea-php83/root/usr/bin/php /opt/cpanel/composer/bin/composer install --no-dev --optimize-autoloader --no-interaction
If it says No such file or directory, your server uses CloudLinux. Try this instead:
cd ~/fieldops
/opt/alt/php83/usr/bin/php /opt/cpanel/composer/bin/composer install --no-dev --optimize-autoloader --no-interaction
Option B: Ask your host (no Terminal)
Open a support ticket and send this message:
Please run this for my account, using PHP 8.3:
cd /home/USER/fieldops && composer install --no-dev --optimize-autoloader --no-interaction
Option C: A one-time cron job (no Terminal)
Add the job
Open Cron Jobs, choose Once Per Minute and paste this as the command:
cd /home/USER/fieldops && HOME=/home/USER /opt/cpanel/ea-php83/root/usr/bin/php /opt/cpanel/composer/bin/composer install --no-dev --optimize-autoloader --no-interaction >> storage/logs/composer.log 2>&1
Wait, then delete it
After a few minutes, check that
vendor/autoload.phpexists in File Manager. Then delete this cron job. If nothing appears, readstorage/logs/composer.log.
Check: in File Manager, /home/USER/fieldops/vendor/autoload.php exists.
cPanel Step 4: Point the Domain and Turn On HTTPS
Your domain must open the public folder inside fieldops. A subdomain is the easiest way, and it leaves any site you already have untouched.
Using a subdomain (recommended)
Open Domains → Create A New Domain. Enter
app.example.com, untick Share document root, set the document root tofieldops/publicand press Submit.Or: a domain you already added
Open Domains → Manage next to the domain and set the new document root to
fieldops/public. If cPanel does not allow this for your main domain, use a subdomain or ask your host to change it.Turn on HTTPS
Open SSL/TLS Status and press Run AutoSSL. Wait until your domain shows a valid certificate.
Check: https://app.example.com (your domain) opens the FieldOps installer. If you see a 500 error or a file list, see Problems and Fixes.
cPanel Step 5: Create the Database
Run the wizard
Open MySQL Database Wizard. Enter a database name such as
fieldopsand press Next.Create the user
Enter a user name such as
fieldopsand a strong password. Write the password down. Press Create User.Give it access
Tick ALL PRIVILEGES and press Next Step.
Write down the full names
cPanel adds your user name in front of both names, so they become
USER_fieldops. You need these full names in the next step.
cPanel Step 6: Run the Web Installer
Open your domain in a browser. It goes to the installer by itself. You never create the settings file (.env) by hand; the installer does it.
Screen 1: Requirements
Every line should have a green tick. Press Continue. A red line tells you exactly what is missing; the fixes are at the end of this guide.
Everything green: press Continue Screen 2: License
Paste your Envato purchase code. You find it on CodeCanyon under Downloads → License certificate & purchase code.
The code shown is a sample; use your own Screen 3: Database
Enter these values, then press Connect & install tables:
Field Value Database host localhostPort 3306Database name USER_fieldops, the full name from Step 5Username USER_fieldops, the full name from Step 5Password The password from Step 5 This creates all the tables and can take a few minutes. Do not close or refresh the page.
Sample values; use your own Screen 4: Site & admin
You can change all of this later:
Field What to enter Site name Your business or platform name Site URL Your full address with https://, for examplehttps://app.example.comLogo, Favicon Optional. You can add them later Multi-vendor marketplace On: other service companies can sign up and sell on your site. Off: you run one company only. You can switch later Company name Your own service company Your name, Email, Password Your owner login. Write it down. This account is also the platform admin Sample values; use your own Screen 5: Finish
You see “… is live!” and the installer locks itself. The page also shows a cron line; you add it in the next step of this guide, so you can ignore it here.
cPanel Step 7: Add the Cron Jobs
Shared hosting cannot keep a program running all the time, so two cron jobs do the background work. Open Cron Jobs and add both with Once Per Minute.
Job 1, the scheduler (reminders, renewals, backups):
cd /home/USER/fieldops && /opt/cpanel/ea-php83/root/usr/bin/php artisan schedule:run >> /dev/null 2>&1
Job 2, the queue (notifications and webhooks):
cd /home/USER/fieldops && /opt/cpanel/ea-php83/root/usr/bin/php artisan queue:work --queue=notifications,webhooks,default --stop-when-empty --tries=3 --max-time=55 >> /dev/null 2>&1
On CloudLinux servers (Option A in Step 3 told you), use /opt/alt/php83/usr/bin/php instead. If you chose another PHP version, change 83 to match it.
cPanel Step 8: Secure and Finish
Adjust the settings file
In File Manager, right-click
/home/USER/fieldops/.envand choose Edit. ChangeLOG_LEVEL=debugtoLOG_LEVEL=warning, add this line at the end and save:SESSION_SECURE_COOKIE=true
Sign in
Open
https://app.example.com/login(your domain) with your owner login. The platform console is at/admin.Set up e-mail
In the console: System → Platform settings. Enter your SMTP details, or invitations, password resets and invoices will not be sent. cPanel’s Email Accounts page gives you an address and its SMTP settings. Details: Mail.
Check the background jobs
After a few minutes, System → Platform health shows the scheduler heartbeat.
Done. Next: First Run and Mobile App.
cPanel: Problems and Fixes
| What you see | What to do |
|---|---|
500 error or a blank page | Usually the vendor folder is missing: repeat Step 3. Also check the PHP version from Step 1. The error details are in fieldops/storage/logs/laravel.log. |
A file list, or 403 Forbidden | The domain does not point at fieldops/public: repeat Step 4. Also check that public/.htaccess exists (with Show Hidden Files on). |
| A red writable line in the installer | In File Manager, select the folder, press Permissions and set 755 (storage and bootstrap/cache, including their subfolders). Use 775 only if it still fails. Never use 777. |
| A red PHP extension line | Turn it on in Step 1, or ask your host to enable it, then reload the page. |
| Database connection failed | Use the full names with your user prefix (USER_fieldops) and host localhost. Check that the user has ALL PRIVILEGES. |
| Installer page timed out on the database screen | Open the page again and enter the same details. Choose Keep the existing data: only the missing tables are added. If it keeps timing out, ask your host to raise the time limit. |
Composer says composer.json needs a higher PHP | The command used an older PHP. Use the full PHP path from Step 3. |
| Uploaded logos or photos do not show | The public/storage link is missing, or the host blocks links. In Terminal run cd ~/fieldops && /opt/cpanel/ea-php83/root/usr/bin/php artisan storage:link, or ask your host to allow it. |
| Reminders or notifications are not sent | Check both cron jobs from Step 7 and their PHP path. To see the error, replace /dev/null in the job with storage/logs/cron.log for a few minutes. |
